Streamline WhatsApp Messaging from Google Sheets Using XPRESSBOT
Google Sheets is a powerful tool for businesses, allowing for secure data storage and easy access. It can serve as a centralized data warehouse, facilitating streamlined operations. However, manually communicating with leads stored in Google Sheets can be time-consuming. This is where XPRESSBOT integrations come in, enabling the automated sending of WhatsApp messages directly from your sheets.
In this article, I’ll walk you through how to automatically send WhatsApp messages using XPRESSBOT and Google Sheets. You can not only send text messages but also pull data from specific columns in your sheet to personalize your communications. Once your campaign is set up on XPRESSBOT, messages will be sent automatically when new data is added or specific events occur.
Steps to Integrate Google Sheets
Set Up Your WhatsApp Message Template:
- Since WhatsApp requires Message Templates for business-initiated messages, you’ll need to create one that includes variables for your Google Sheets data. Follow these steps to create a message template:
- Log in to your XpressBot dashboard and navigate to the “Message Templates” section.
- Click on the “Create” button to start a new template.
- Assign a name to your template, choose the appropriate Locale, and select a category (e.g., Marketing).
- Write the message body, incorporating variables that will pull data from your Google Sheets columns.
- Save your template and check the approval status. If approved, it’s ready for use in your automation.

Setting Up a Webhook Workflow in XpressBot
To automate your messaging process in XPRESSBOT, follow these simple steps to create a Webhook Workflow:
- Access the Webhook Workflow Section: From the left side menu, click on “Webhook Workflow” to navigate to the relevant section.
- Create a New Workflow: Click on the “Create” button to start setting up your new workflow.
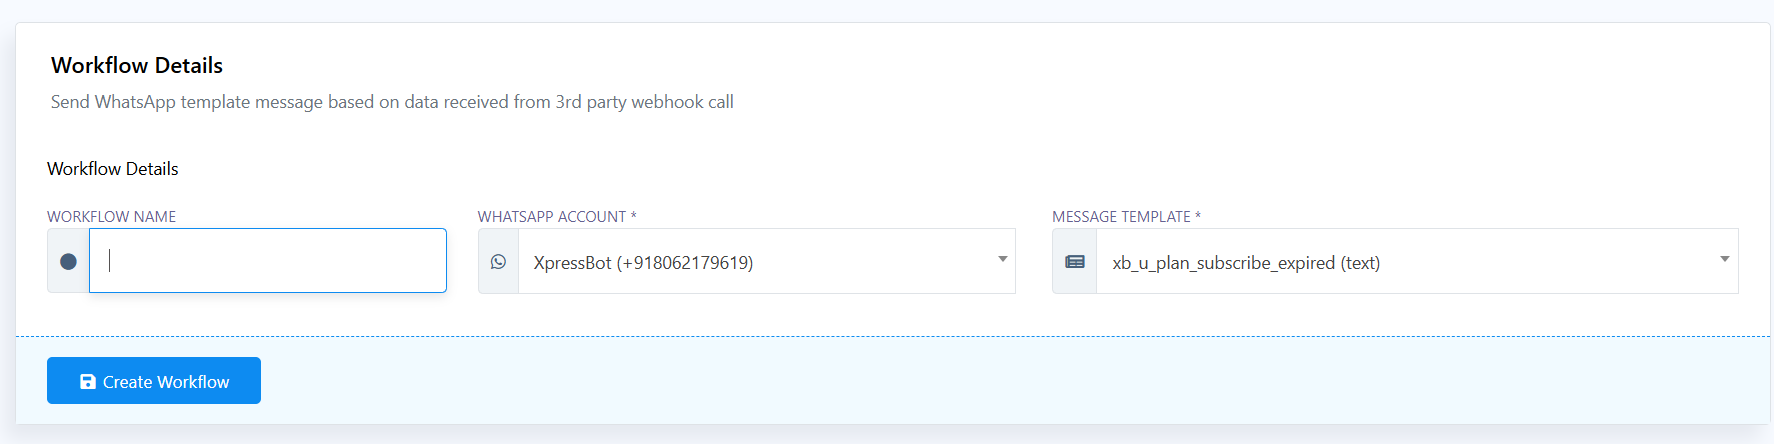
- Name Your Workflow: Give your workflow a descriptive name that reflects its purpose.
- Select Your WhatsApp Number: If you have multiple WhatsApp numbers linked to your account, choose the appropriate one for this workflow.
- Choose Your Message Template: Select the “Message Template” you previously created for sending messages.
- Finalize Your Workflow: Click on the “Create Workflow” button to save your settings and activate the workflow.
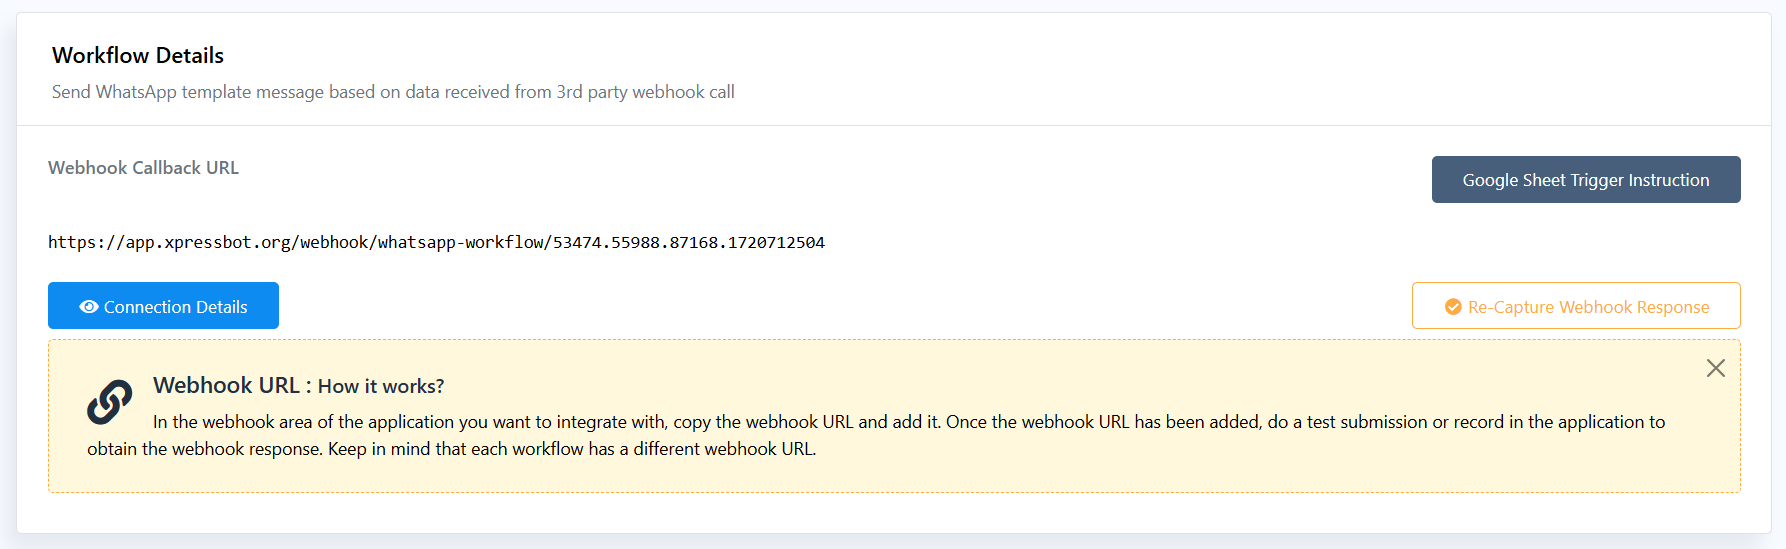
- Once you create the Webhook, Copy the webhook URL
Configuring Your Google Sheet for XpressBot Integration
To effectively use XpressBot for sending messages, ensure your Google Sheet is properly set up:
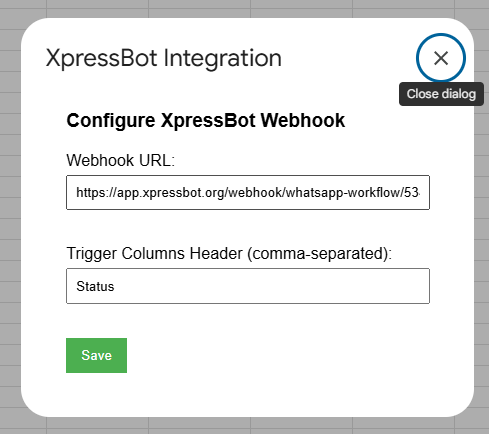
- Install the addon using the link https://workspace.google.com/marketplace/app/xpressbot_whatsapp_integration/886992011955
- Then You need to enter the Webhook URL and the trigger column
- Required Column: Your Google Sheet must contain a column titled Phone Number. This column will be essential for identifying the recipients of your messages. Other columns can contain variable data that can be used in your message templates.
Webhook Workflow Mapping in XpressBot
- Capture Webhook Response: Return to the XpressBot dashboard and click on “Capture Webhook Response.”
- Add Sample Data: Switch back to your Google Sheet and input some sample data. This data will be sent to XpressBot as raw data, which is essential for mapping to your message template.
- Mapping Data:
- In the Phone Number field, select the column that contains the phone number data.
- Similarly, map the other row data to the corresponding variables used in your message templates.
- Save Your Workflow: Once all mappings are complete, be sure to save the workflow to finalize the setup.
Conclusion
Incorporating XpressBot with Google Sheets to automate WhatsApp messaging can significantly streamline communication processes for businesses. By setting up Webhook Workflows and properly mapping data, you can ensure that your messages are not only timely but also personalized, enhancing customer engagement.
The integration allows you to harness the power of structured data within Google Sheets while utilizing WhatsApp’s reach and effectiveness for direct communication. With careful configuration, including creating message templates and mapping relevant variables, you can automate interactions that would otherwise be time-consuming.
By following the outlined steps, you’ll be well-equipped to implement this powerful automation tool, driving efficiency and improving responsiveness to your leads and customers. Embrace this technology to elevate your communication strategy and stay ahead in today’s fast-paced business environment.