XpressBot External HTTP API Integration Guide
Step 1: Access the HTTP API Section
- From the XpressBot dashboard, go to the “WhatsApp HTTP API” section:
- Navigate via Integration → HTTP API.
- This is where you can view your existing API connections and add new ones.
- Click on the “Create” button to initiate the setup of a new API connection.
Step 2: Add API Connection Details
In this step, you’ll define the connection settings for integrating with external services.
- API Name: Choose a recognizable name for the API connection (e.g., “WordPress User Create”).
- Method: Select the appropriate HTTP method (e.g., POST, GET) that aligns with the external API’s requirements.
- Endpoint URL: Provide the full URL of the external API (e.g.,
https://example.com/api/v1/users/create). - Test Subscriber ID: Insert a valid subscriber ID. For testing, use your own phone number’s subscriber ID (you can copy it from the Subscriber Manager). This ID will be used to call the API during the connection verification process.
- Note: For dynamic data, ensure that required fields (system or custom) are correctly passed. Initially, use a test subscriber ID to verify the connection.
Step 3: Configure Request Headers
Here, you define the headers required to authenticate and format the request:
- Content-Type: Choose
application/jsonor another format as required by the external API. - Authorization: If the API requires authentication (e.g., Bearer Token, Basic Auth), add the necessary authorization header with the appropriate credentials.
Step 4: Configure Request Body (Optional)
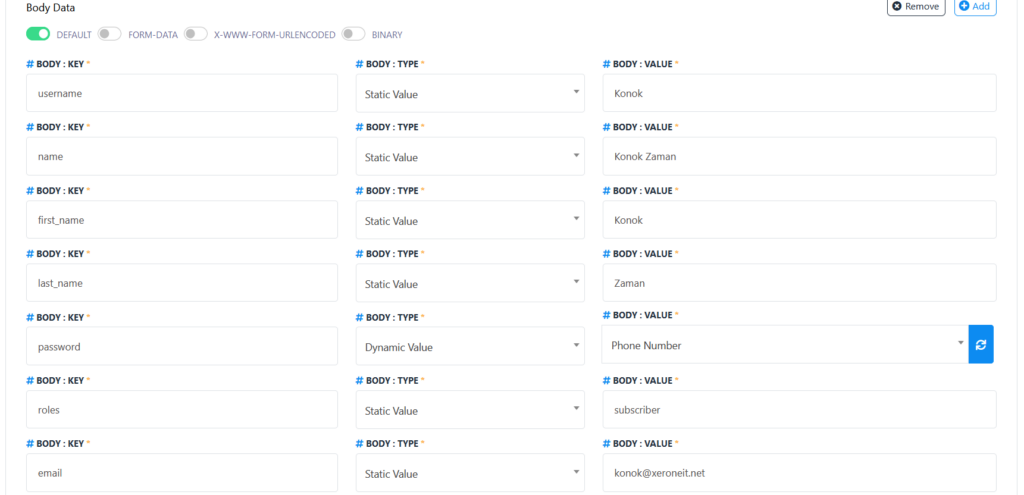
For POST or PUT requests, you may need to send data in the request body. This is where you can define the fields.
- Body Data Fields: Include any necessary fields for the API request (e.g., user details like username, first_name, last_name, email).
- You can choose whether each field will be a static value (manually inputted) or a dynamic value (pulled from external sources or user input).
- You can configure the body format, including:
- Form Data
- X-WWW-FORM-URLENCODED
- Raw Format
Ensure the data format matches the API specifications.

Step 5: Save and Verify the Connection
Once you have entered the required settings, proceed with the following:
- Click the “Verify Connection” button to send a test request to the external API and confirm that the connection is properly configured.
- If the test is successful, click Save API to store the connection.
Step 6: Map API Response Data
After establishing a successful API connection, you can map the API’s response data back into your workflow:
- HTTP API Response Mapping: This section lets you map fields from the API’s response (e.g., user details, error messages) to subscriber data or other variables within XpressBot.
- Use these mapped fields later in your chatbot’s logic, ensuring the response is utilized in subsequent actions.
Step 7: Use the API in Flow Builder
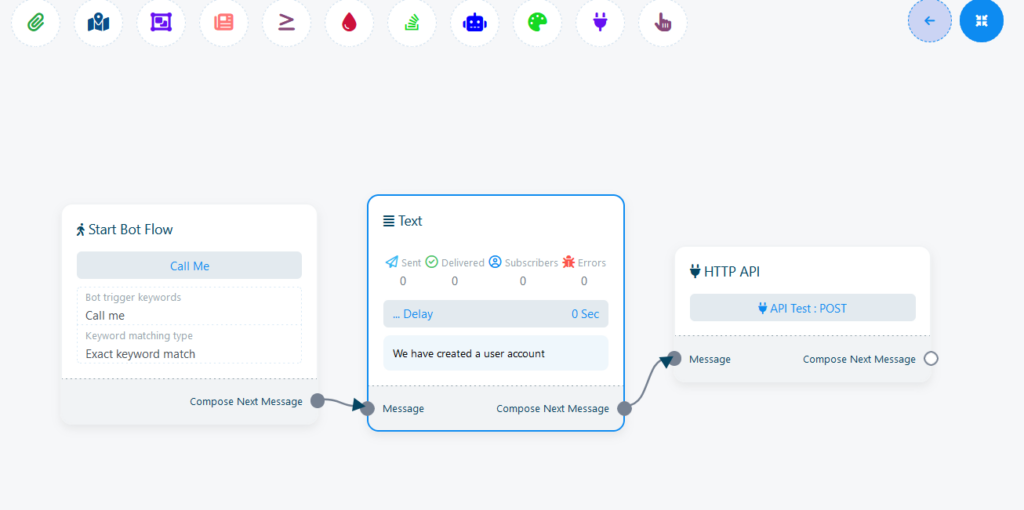
Once the API is successfully integrated and response data is mapped, you can use this API connection within your Flow Builder:
- HTTP API Element: Add the HTTP API Element anywhere in your flow, specifying when and how the API should be called based on user actions or system triggers.
- Configure the flow to call the API at strategic points, such as after receiving user input or during automated tasks.

Using XpressBot for integrating external HTTP APIs provides several key benefits, making it an effective tool for creating more powerful, dynamic, and personalized chatbot experiences. Below are some of the primary benefits of implementing this content and API integration on the XpressBot platform:
1. Seamless Integration with External Services
By integrating external APIs, you can extend the capabilities of your XpressBot beyond its default features. Whether it’s connecting to a CRM system, third-party services like WhatsApp, or other external platforms, the HTTP API integration allows you to easily pull in data and push actions between XpressBot and external systems.
- Example: If you need to create or update users on a WordPress site directly from the bot, the API integration helps make this seamless.
2. Enhanced Personalization of User Interactions
With API integration, you can use external data to personalize interactions. The ability to map API responses to user data (e.g., username, preferences, or account details) means you can create more tailored, context-sensitive responses.
- Example: Pulling in user data like purchase history or past interactions can enable XpressBot to offer personalized recommendations or messages based on what the user has done before.
3. Flexibility in Connecting Multiple Platforms
XpressBot’s ability to integrate with various external APIs (e.g., e-commerce platforms, social media, CRM systems) gives you flexibility in building multi-channel workflows. By connecting XpressBot to multiple services, you ensure smooth operations across platforms, like sending data from your bot to a backend system or interacting with other applications.
- Example: Integrating with a payment gateway API can allow XpressBot to process payments directly through the chatbot.
4. Real-Time Data Access and Automation
Through API integration, your bot can instantly access real-time data and perform actions like sending messages, making updates, or triggering workflows based on current information. This enhances the bot’s ability to respond dynamically to user input and changes in external systems.
- Example: Fetching the latest product inventory from an external API and displaying it in real-time in your chat interactions.
5. Simplified Workflow Automation
Once an API connection is established, you can automate processes by using Flow Builder to trigger API calls based on user interactions. This reduces manual intervention, streamlines operations, and speeds up the delivery of services to your customers.
- Example: Automatically updating a customer’s subscription plan when they interact with the bot, based on data pulled from an external system.
6. Improved Error Handling and Debugging
The ability to verify the connection and map responses allows you to ensure that the API integration is working correctly before going live. Additionally, error handling mechanisms, such as retries or fallback messages, ensure that users have a smooth experience even if there are issues with the external system.
- Example: If an API call fails due to external issues, you can configure your bot to inform the user and retry the operation, ensuring a better user experience.
7. Reduced Development Time
By using pre-configured HTTP API integration tools, you significantly reduce the amount of custom development needed. With intuitive flow-building tools and easy-to-use configuration settings for API connections, you can set up and launch sophisticated integrations quickly.
- Example: Connecting a customer support API without needing to write complex code—simply configure the connection through the UI and start using it.
8. Scalability
As your business grows, you can easily scale your chatbot by integrating more APIs or adding new functionalities to existing API connections. XpressBot’s flexibility allows you to adapt the bot’s capabilities as your needs evolve without starting from scratch.
- Example: Adding an API connection for an additional payment method or integrating a new external service as your bot’s capabilities expand.
9. Streamlined API Response Mapping
The ability to map API response data directly into your chatbot’s workflow means that the data you pull from external APIs can be used in subsequent chatbot actions. This makes it easier to manage data and create more interactive and engaging user experiences.
- Example: If an API returns user data (e.g., name, purchase history), that information can be directly injected into chatbot responses, making the interaction more relevant and engaging.
10. Easy to Test and Debug
XpressBot allows you to verify API connections and test the integration before going live. This ensures that any issues are caught early in the development process, reducing the chances of errors affecting the user experience.
- Example: Testing a connection with an external CRM API to ensure that it successfully retrieves customer information before deploying it in a live chat flow.
