Hello, everyone!
In the Fourth Industrial Revolution era, chatbots are a faster, smarter, and more scalable enterprise-grade conversational AI platform. Actually, a chatbot is software that simulates instantly human-like conversations with users via chat.
There are different types of chatbots with various interfaces that may be free or costly.
In this article, I will mainly discuss how to build a WhatsApp chatbot in six simple steps.
Before going to my topic, I will tell you about WhatsApp chatbots, why they are important, and discuss some prerequisites for building a chatbot on WhatsApp.
What is a WhatsApp chatbot?
A WhatsApp chatbot is the software that can automatically reply to messages on WhatsApp. It works 24/7 and can have multiple conversations with different people at the same time. WhatsApp chatbots are often used to provide information about a company or its products and services by answering customer questions automatically. However, WhatsApp chatbots are often based on a conversational flow that is created by using three main elements: – i) Trigger, ii) Action, and iii) Condition.
Why do we use WhatsApp chatbots?
A better WhatsApp chatbot integrated uniquely into your business will be a massive advantage for you. Your customers will get the answers to their questions instantly. Therefore, you can save time (respond in seconds rather than days) and reduce contact center costs. Obviously, you will be more efficient, friendly, and interactive on WhatsApp, which will build the value of your brand.
Though the WhatsApp chatbot is not human, it can handle multiple queries at once. Safety and privacy are the main fundamentals of the WhatsApp Chatbot ecosystem, and it is free from ads and spam. By default, end-to-end encryption is enabled.
There are many reasons for using WhatsApp’s chatbot:
- To set up automated responses outside of business hours, i.e., everywhere 24/7 (customized messages to customers).
- To improve marketing campaigns, lead generation, and sales efforts.
- To enhance customer service by offering better support and experience.
- To establish a strong brand identity by recommending new products and services.
- To integrate your chatbot with your existing CRMs, like Hubspot, Shopify, or Zoho.
Not only WhatsApp is one of the biggest and most popular messaging apps in the world, with over 2 billion users globally, but also it is available in more than 180 countries and 60 different languages. Moreover, as of January 2020, WhatsApp had registered over 5 billion installs on the Google Play Store, making it only the second non-Google app to achieve this milestone.
As your customers are already there, you should use WhatsApp. Hence, they are just waiting for you to send them a message, and undeniably, this massive user base gives WhatsApp bots easy access to a huge market. Therefore, to start a conversation, it is not necessary to install a new instant messaging app.
How to build a WhatsApp chatbot:
There are two options for building a WhatsApp chatbot:
- Manually write the specific code for the chatbot.
- Use XpressBot to build chatbots that do not require any coding knowledge.
Obviously, coding the chatbot manually requires technical knowledge, which may be challenging to manipulate. So, if you are not an expert or do not have a developer, I recommend the second option.
Building a WhatsApp chatbot with xpressbot is very simple and can be done without writing even a single line of code. To build a WhatsApp bot, it involves the following major steps:
Step1: Sign up Xpressbot: At first, you have to go the website and fill up the “Xpressbot-Sign up” form.
Step 2: Connect your WhatsApp business account on Xpressbot:
Now, please login your account as follow instructions:
Visit Xpressbot.org –> 2. Click on “Sign” button –> 3. Fill up the fields of the form –> 4. Click on “Login” button.
Caution: If you do not have any business account and verified phone number, kindly create an app for WhatsApp. Then, register a phone number and configure the webhook. Nevertheless, if you have these above things, you won’t do the tasks.
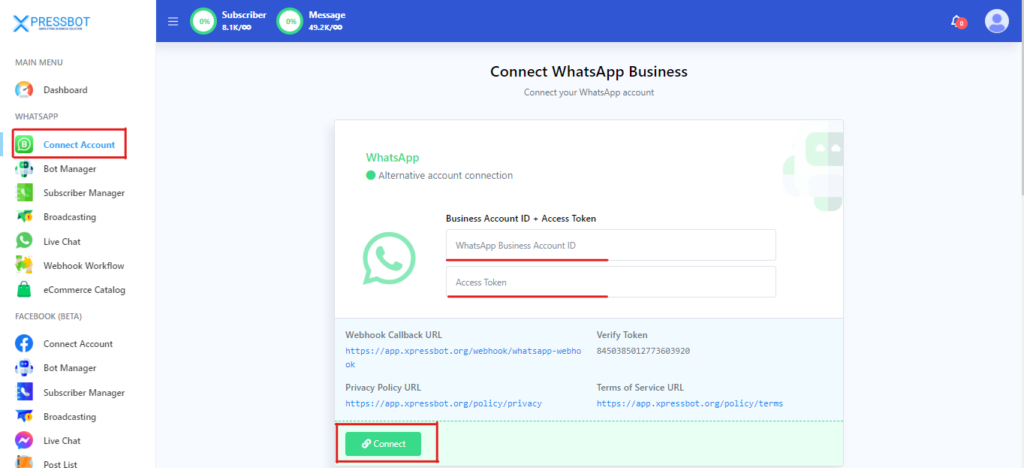
So, to get the WhatsApp Business Account ID, go to the Business settings page. Then at the left sidebar of the page, select the WhatsApp account menu. Instantly, the WhatsApp Accounts section will appear. Now select your app and copy the WhatsApp Business Account ID.
Now, from “Dashboard”, you have to follow the instructions:
1. Click on the “Connect Account” navigation menu. –> 2. Give your business account ID and Access Token in the corresponding fields. –> 3. Click on the “Connect” button.

My suggestion is that you do not use the temporary access token. However, if you want to see a video tutorial, please click here.
Step 3: Think about the conversation and fulfill the requirements:
Generally, every business has its own style. Therefore, I think there is no recipe for a chatbot with the WhatsApp design. So, you should just keep your customer’s journey in mind so that you can map out your conversation elements and diagram.
Step 4: Configure it in the WhatsApp Bot Manager of Xpressbot and test your chatbot on WhatsApp:
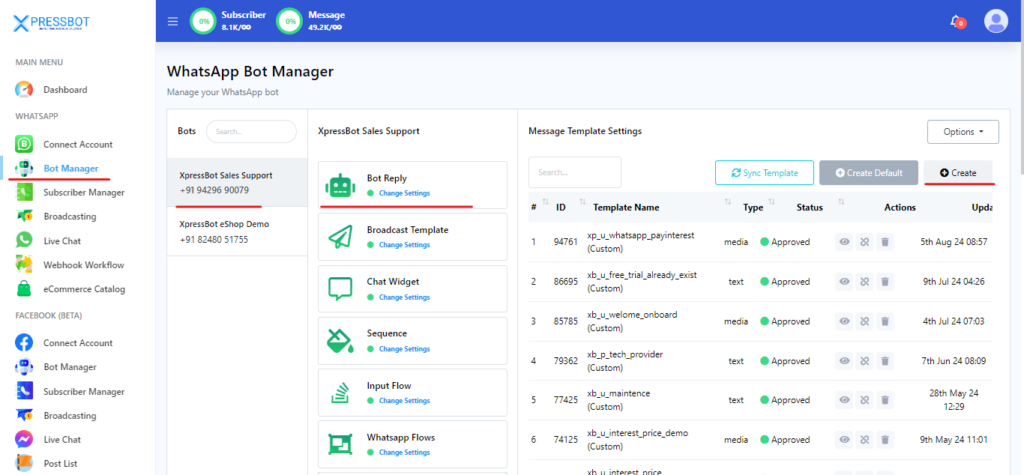
Now, from the “Dashboard”, you have to create a bot according to the instruction,
1. Click on the “Bot Manager” navigation menu –> 2. From “WhatsApp Bot Manager“, select the desired Bot Account. –> 3. Click on “Bot Reply” section –> 4. Click on the “Create” button.

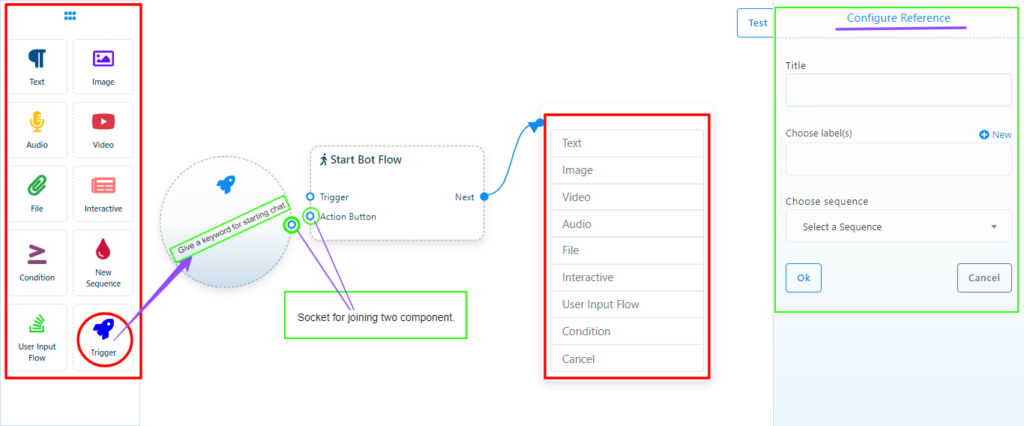
Instantly, a bot flow-builder canvas will appear if you complete the above task successfully.

You will see the document menu with 11 components, which is on the left side of the canvas. From the boxes, you can drag and drop any component on the canvas. Suppose you select the “Trigger” tool. Then, drag and drop it on the canvas. Now, a trigger component will appear on the canvas, and to configure it, you have to double-click on it. Instantly, a trigger configuration sub-menu on the top-right side of the canvas will appear. Give a keyword like “Start” and click on the “Ok” button to save it.
Now, connect the trigger to the “Start Bot Flow” by joining the “Trigger” socket. So, you double click on the “Start Bot Flow” and instantly a configuration modal form named “Configure Reference” will appear at the top-right side of the canvas.
Next, give it a title and click on the “Ok” button to save it. Then, you drag from the “Next” socket of “Start Bot Flow” and drop on the canvas. Instantly, you will see a component list.
Here, you can choose any tool. Suppose you choose the “Text” option. Now, to configure it, double-click on it. Instantly, a modal form will appear on the top-right side of the canvas. To provide your reply, write a message in the message field, and to save it, click the “Ok” button.
Now, from here, you can drag the “Next” socket of it and drop it onto the canvas if you want to elaborate your bot. So, you can create a post-buck button, a user input flow, etc. Similarly, on the canvas, you will build your bot according to your ideas.
If necessary, you can seek assistance from a video.
Step 5: Chat from a WhatsApp number and test your WhatsApp chatbot:
Now, in WhatsApp Apps, you can start a chat conversion from a customer WhatsApp number. Firstly, send a message with the keyword which is given in the Trigger. Then, test your WhatsApp chatbot. If the conversion runs successfully, the bot creation will be okay.
Step 6: Improve your chatbot through monitoring: By collecting feedback from customers and monitoring your chatbot conversations through our platform, you can improve your chatbot.
