
Overview of Integration
- Purpose: Integrating WhatsApp with WordPress allows you to send messages directly from your website. This can enhance customer communication, provide notifications, and improve user engagement.
- XpressBot API: XpressBot is a messaging API that facilitates communication through WhatsApp. It enables sending text messages, images, and more, leveraging the WhatsApp platform.
Common Use Cases
- Contact Forms: Automatically send confirmation or thank-you messages to users after they submit a contact form.
- Order Notifications: Notify customers about their order status, shipping updates, or any changes.
- Promotional Messages: Send promotional offers or updates directly to users who have opted in.
Steps for Integration
API Setup:
- Create an account with XpressBot and obtain an API key.
WordPress Plugin:
- Use plugins to facilitate API requests. Common options include WP Webhooks, WP REST API, or custom code.
Custom Code:
- Write custom functions in your theme or a custom plugin to handle sending messages. This involves making POST requests to the XpressBot API with the required data.
Testing:
- Thoroughly test the integration to ensure that messages are sent correctly under various scenarios.
Best Practices
- User Consent: Always obtain consent from users before sending messages via WhatsApp.
- Message Personalization: Personalize messages based on user data to enhance engagement.
- Error Handling: Implement error handling to manage failed API calls or invalid numbers.
Additional Resources
- API Documentation: Refer to the XpressBot API documentation for detailed information on endpoints, parameters, and response formats.
- WordPress Codex: Check the WordPress Codex for more information on hooks and functions related to form handling and API integration.
Step 1: Configuring the XpressBot HTTP API for Integration
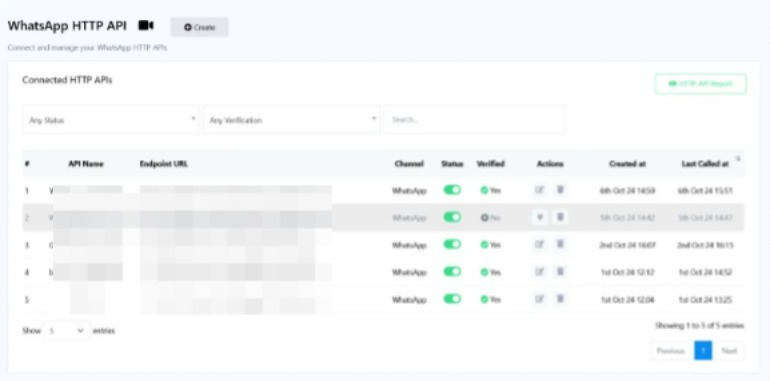
Access the API Section
In your XpressBot dashboard, navigate to the “API” section. From the left navigation menu, select “Integrations” or “Settings.” Look for the “HTTP API” option and click on it, then choose “WhatsApp API.”
Create a New API Connection
Click “Create” to set up a new API connection.
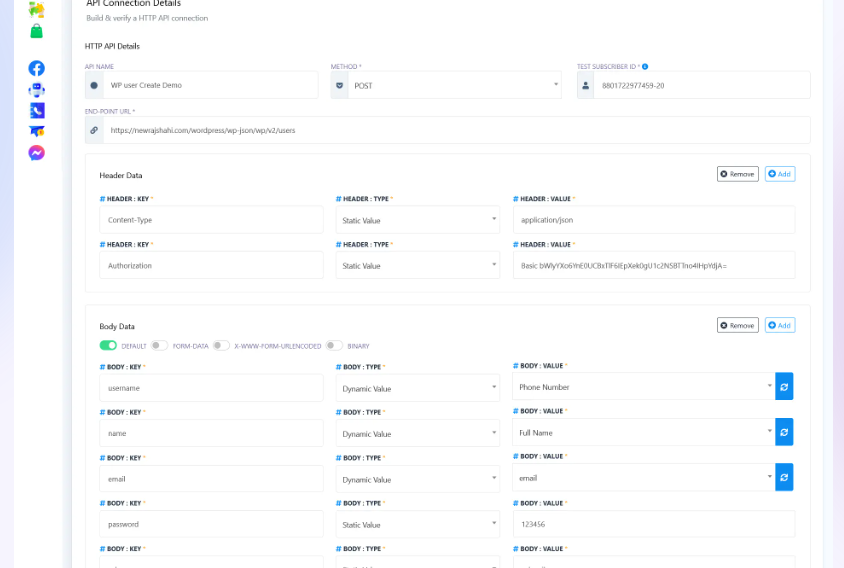
Configure API Details
- API Name: Name your API connection, such as “WordPress User Create Demo.”
- Method: Set the method to POST, as we are sending data to create a new user.
- Endpoint URL: Input the WordPress REST API endpoint for user creation:
https://yourwebsite.com/wp-json/wp/v2/usersStep 2: Configuring Authentication and Request Headers
Authorization with Application Password
To authenticate with WordPress, you’ll need to use Basic Authentication with an application-specific password. Here’s how to generate one:
- Log into WordPress: Access your admin dashboard.
- Navigate to User Profile: Go to Users > Your Profile.
- Generate Application Password: In the Application Passwords section, give your integration a name (e.g., “XpressBot API”) and generate the password.
- Save the Password: Copy and save the password, as you won’t be able to view it again.
Encoding Username and Application Password in Base64
To include this password in your API headers, encode your username:application_password string in Base64:
- Example: If your username is
adminand your application password is1234567890abcdef, you’ll encodeadmin:1234567890abcdef.
You can use various online tools for Base64 encoding. The encoded result will look like this:
YWRtaW46MTIzNDU2Nzg5MGFiY2RlZg==Adding Request Headers in XpressBot
- Header Key: Content-Type
Header Value: application/json - Header Key: Authorization
Header Value: Basic YWRtaW46MTIzNDU2Nzg5MGFiY2RlZg==
Step 3: Defining the Request Body for User Creation
In the Body Data section of the XpressBot API configuration, you need to map the fields that will be sent to WordPress to create the user. Common fields include:
- username: (e.g., phone number from the chatbot input)
- name: (e.g., full name from user input)
- email: (dynamically captured email)
- password: Static or dynamically generated
- roles: Set this to
subscriberor any other role as per your requirement
You can map static values or dynamic values collected from the chatbot conversation (like a user’s email or name).
Step 4: Testing the API Connection
Once you’ve configured the API, click “Verify Connection” to ensure everything is set up correctly. If the connection is successful, XpressBot will confirm that the API endpoint is reachable and that the data is being sent properly.
Step 5: Creating the Flow in XpressBot’s Flow Builder
Start the Bot Flow
- Create a New Flow: Begin by creating a new bot flow.
- Add a Trigger: Use a keyword trigger (e.g., “WPAPITest”) that users can type to initiate the flow.
User Input
- Collect User Information: Add a User Input step to gather the user’s information, such as their email address or name. Ensure to save this data in custom fields.
Text Message
- Send Confirmation Message: After collecting the information, send a confirmation message to the user:
Thanks for your email. We are creating your WordPress account, please wait a moment.Trigger the API Call
- Add HTTP API Action: Include the HTTP API action in your flow. Map the collected user input (like email and username) to the relevant fields in the API request body.
Send Success Confirmation
- Confirm Account Creation: After the API call is completed, send a success message to the user:
Hi, your WordPress account has been created. Your username is: #WordPressUserId# and your default password is: 123456.Here, #WordPressUserId# represents a custom field within XpressBot.
Step 6: Testing the Flow
After setting up the API, it’s time to test the bot flow:
- Run Tests: Interact with your chatbot by using the trigger keyword (e.g., “WPAPITest”) to initiate the flow.
- Verify User Account Creation: Check if the user account is successfully created on WordPress.
- Check User Input: Ensure that all user input fields, such as email and username, are accurately captured and sent to the API.
- Review Responses: Confirm that the appropriate confirmation messages are received by the user after account creation.