Training an AI assistant like XpressBot with custom FAQs, URL integration, and file handling involves empowering the chatbot to understand and manage specific tasks that enhance user interactions. XpressBot is an intelligent tool designed to automate customer service and support. By training it with custom FAQs, you enable it to instantly respond to common customer questions, improving efficiency and saving time. URL integration allows XpressBot to retrieve and share relevant web links in response to user queries, providing real-time access to important information. Additionally, file handling enables the chatbot to process file uploads and downloads, allowing users to interact with documents, images, or other media directly within the conversation.
These features together make XpressBot a more dynamic, interactive, and capable assistant that can assist with a wide variety of tasks in customer support, sales, and other service-oriented functions.
Configuring the Central Control System: “Enable XpressBot AI Assistant” – A Comprehensive Guide
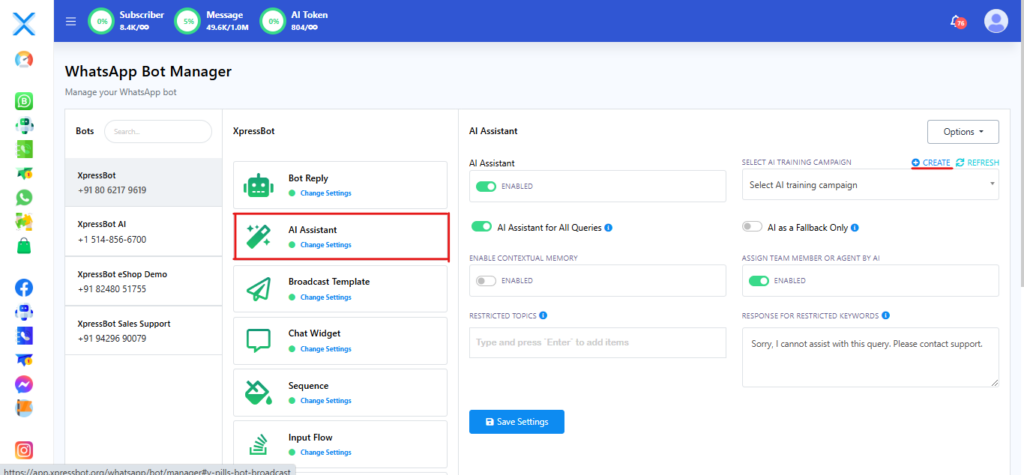
The centralized control system for the XpressBot AI Assistant is located under the Bot Manager section. This robust system allows you to efficiently manage and optimize your XpressBot’s activities, create new AI training campaigns, and select the most suitable AI campaign tailored to your business needs and customer support strategies. In simple terms, this feature provides a highly customizable and user-friendly interface that enhances the performance of your chatbot, ensuring professional interactions with your customers.
With XpressBot, you can seamlessly adjust your chatbot’s behavior, ensuring that it delivers accurate and contextually relevant responses, while maintaining strict control over sensitive or restricted content. The central control system not only enables customization of responses but also allows for fine-tuning based on user interactions, ensuring that the chatbot continuously improves and aligns with your business objectives.
In the following sections, we will walk you through the steps to configure this powerful feature, from setting up training campaigns to selecting the right content filters. Whether you are optimizing your chatbot for customer service, sales support, or other business operations, XpressBot provides an intuitive platform that offers complete control over your chatbot’s training and performance, ensuring a seamless experience for your users.
Enabling XpressBot AI Assistant: A Step-by-Step Guide
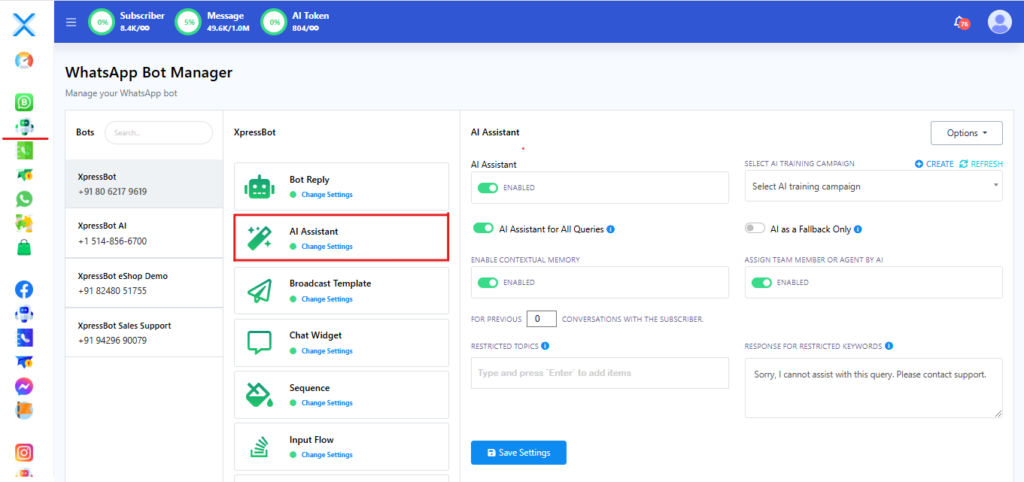
To get started, navigate to the Bot Manager section. Under the Bot Reply settings, you will find the option labeled ‘Enable XpressBot AI Assistant’. Once this feature is activated, a range of settings will become available. From this point, you can easily modify and customize the behavior and interactions of your XpressBot AI Assistant. This allows you to tailor the chatbot’s responses, ensuring it aligns perfectly with your business needs and customer support goals.
AI Training Campaign: Customizing Your XpressBot AI Assistant
In this section, you can select an AI training campaign that has already been created and trained. If you’d like to create a new campaign, simply click the ‘Create’ button, which will direct you to the AI Training Campaign page, where you can design and train new AI chatbots tailored to your needs. Additionally, the ‘Refresh’ option allows you to quickly update the settings and ensure the latest configurations are applied.
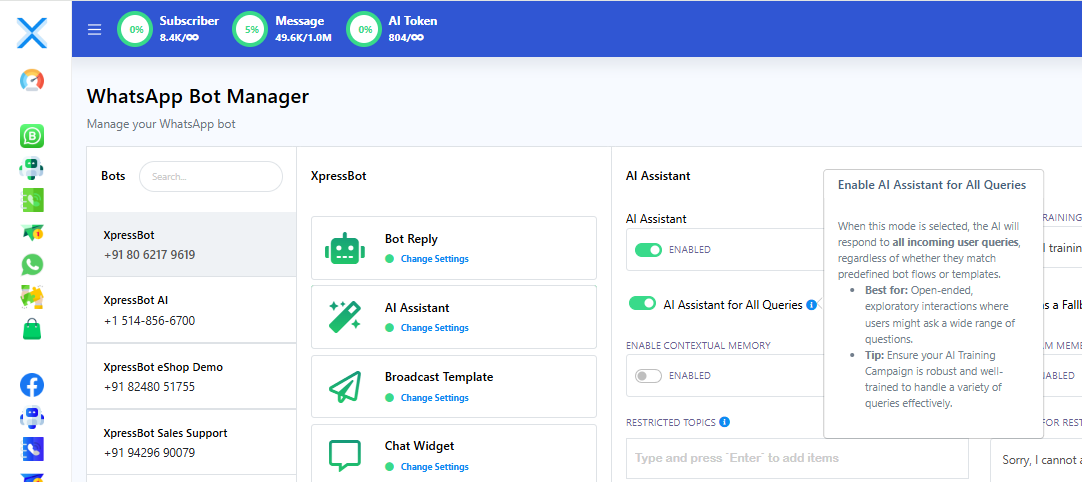
AI Assistant for All Queries: Ensuring Comprehensive Responses
By enabling this option, the AI will respond to all customer queries, even if they don’t match specific bot flow keywords or templates. This option requires the chatbot to be thoroughly trained and optimized with all necessary input and data, ensuring that it can handle a wide range of user inquiries accurately and effectively.
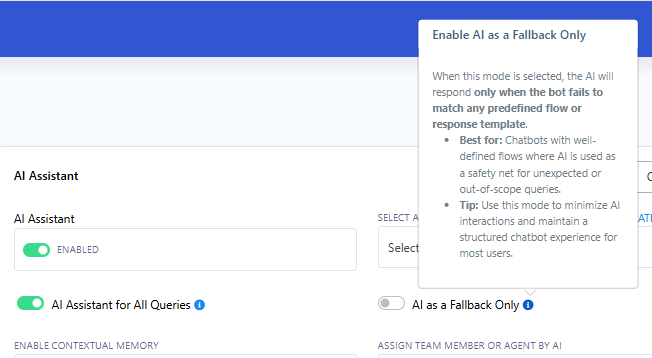
AI as a Fallback Option: Ensuring Seamless Chatbot Interactions
When the ‘AI as a Fallback Only’ option is enabled, the XpressBot will only respond when the ‘No Match Reply’ is triggered. This means that if the chatbot fails to find a match within the predefined bot flow, the AI will take over and provide a response based on the trained data. This option ensures that the chatbot remains efficient while relying on AI to handle edge cases or unexpected queries.
Advanced AI Features for Enhanced XpressBot Performance
Assign Team Member or Agent by AI
Activating the ‘Assign Team Member or Agent by AI’ option empowers your XpressBot to intelligently assign a human agent when needed. Using advanced Natural Language Processing (NLP) capabilities, the AI chatbot can analyze user intents and detect specific keywords or phrases that indicate a request for escalation. This ensures that users are seamlessly transferred to a human agent whenever necessary, offering a more personalized and effective support experience.
Enable Contextual Memory
By enabling ‘Contextual Memory’, the XpressBot gains the ability to remember and reference past conversations with users. This feature helps the chatbot maintain continuity in interactions, ensuring that it can offer relevant responses based on previous exchanges. You can configure the number of messages the chatbot retains in its memory. For example, if you set it to retain the context of the last 5 messages, the bot will remember and refer to those interactions, providing a more seamless and personalized experience for users.
Restricted Topics
The ‘Restricted Topics’ feature helps you define which subjects the chatbot should avoid, ensuring that conversations remain professional and appropriate. By configuring this option, you can prevent the chatbot from engaging in sensitive, inappropriate, or off-limit topics. This helps maintain a controlled and respectful environment for your users, while also safeguarding your brand’s reputation.
Response for Restricted Keywords
With the ‘Response for Restricted Keywords’ option, you can set predefined replies for specific restricted keywords. If a customer enters any restricted terms during a conversation, the chatbot will respond with a polite and professional message explaining the restriction. This ensures that the conversation remains respectful and aligned with company policies while providing clear communication to users.
Managing and Customizing Your XpressBot AI Assistant
In conclusion, this central control section of XpressBot AI Assistant offers you comprehensive tools to manage, customize, and refine your chatbot’s behavior. From assigning human agents to handling contextual memory and restricted topics, these advanced features ensure that the chatbot operates efficiently while maintaining professionalism and security. You also have the ability to configure responses to restricted keywords, ensuring a smooth and controlled user experience.
Now, let’s dive into the next steps: training your AI chatbot with relevant data, FAQs, and URLs to optimize its performance and effectiveness in handling customer interactions.
AI Chatbot Training with Data: A Step-by-Step Guide
- Access the Dashboard: Start by logging into XpressBot Dashboard.
- Navigate to Bot Manager: Once on the dashboard, go to the Bot Manager section.
- Enable AI Assistant: In the Bot Manager, click on ‘Enable AI Assistant’ to activate the AI-powered features for your chatbot.
- Create AI Campaign: After enabling the AI Assistant, click on the ‘Create’ button to start a new AI training campaign.
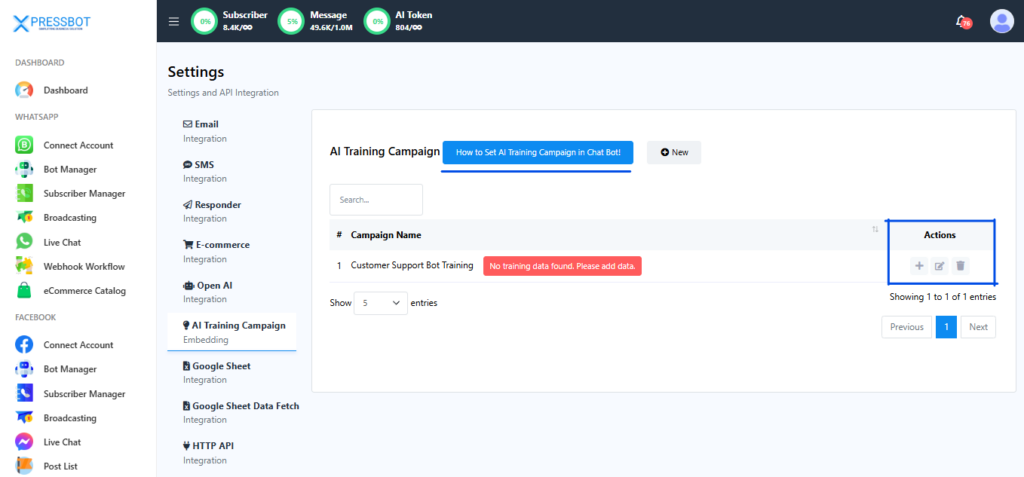
After enabling the XpressBot AI Assistant, you will be redirected to the ‘AI Training Campaign’ page. To begin, click on ‘New’ to create a new AI training campaign using your trained data. Once the campaign is created, you can easily edit and fine-tune your chatbot’s settings from the Action Menu.
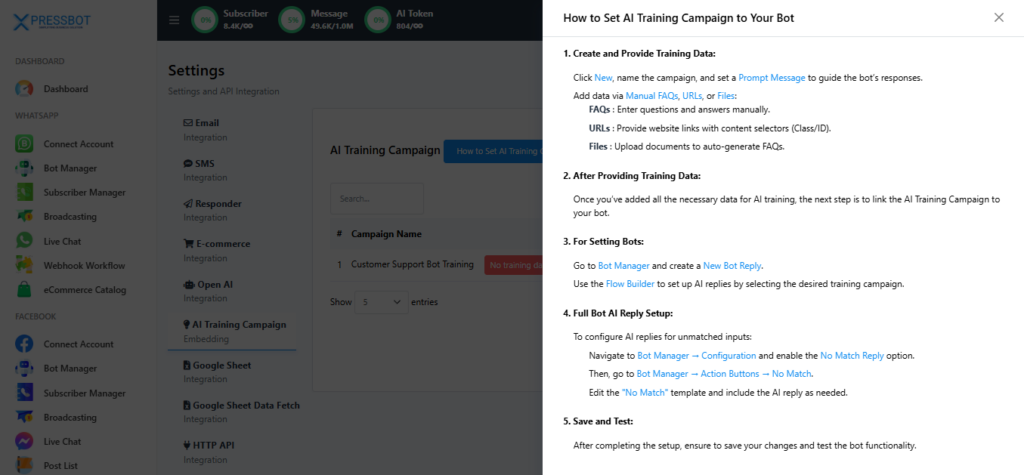
Setting Up the Primary Prompt for Your XpressBot AI Chatbot
After clicking ‘New’ to create your AI training campaign, you will be directed to a page where you can configure the ‘Campaign Name’ and ‘Prompt Message’.
- Campaign Name: Enter a descriptive name for your campaign. This will help you easily identify and manage the campaign later.
- Prompt Message: In this section, add the initial message or prompt that your AI chatbot will send to users when the conversation begins. This message sets the tone for user interactions and can guide the chatbot’s behavior in initial conversations.
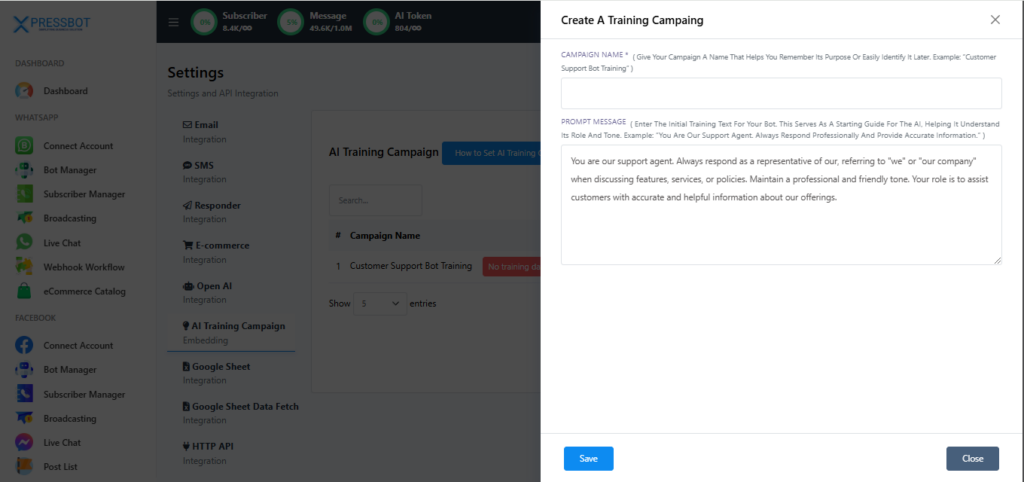
By default, XpressBot comes with a prompt message that provides the AI with basic instructions on understanding its role. However, you can personalize and tone this message to better align with your specific needs and business objectives.
Training the XpressBot AI Chatbot with Manual FAQs
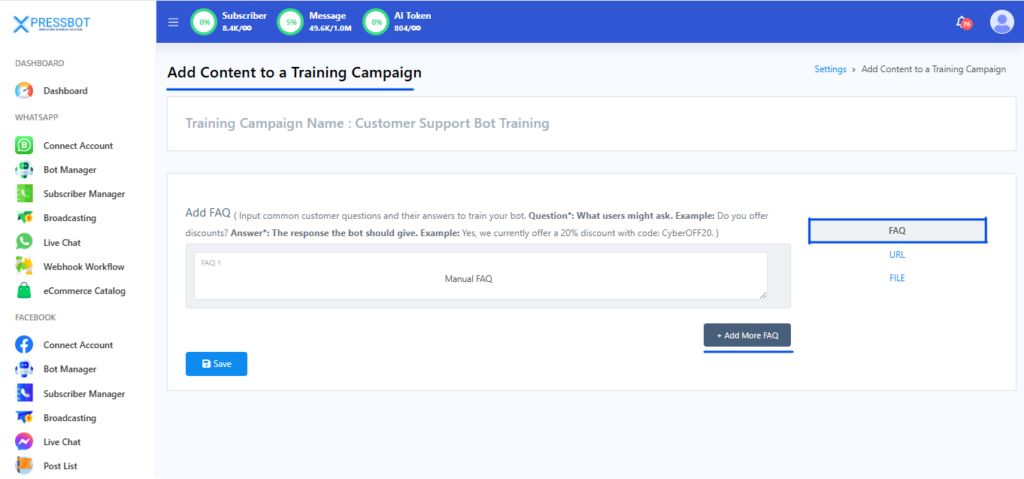
Once your AI training campaign is created, you can begin training the chatbot with manual FAQs. To do this, simply click the Plus button from the ‘Actions’ menu to modify and add new FAQ data. This will allow you to input specific questions and answers, helping your chatbot respond more effectively to common customer inquiries. Customizing the FAQs ensures that the AI is equipped with accurate and relevant information to assist users.
Training the XpressBot AI Chatbot with URL Integration
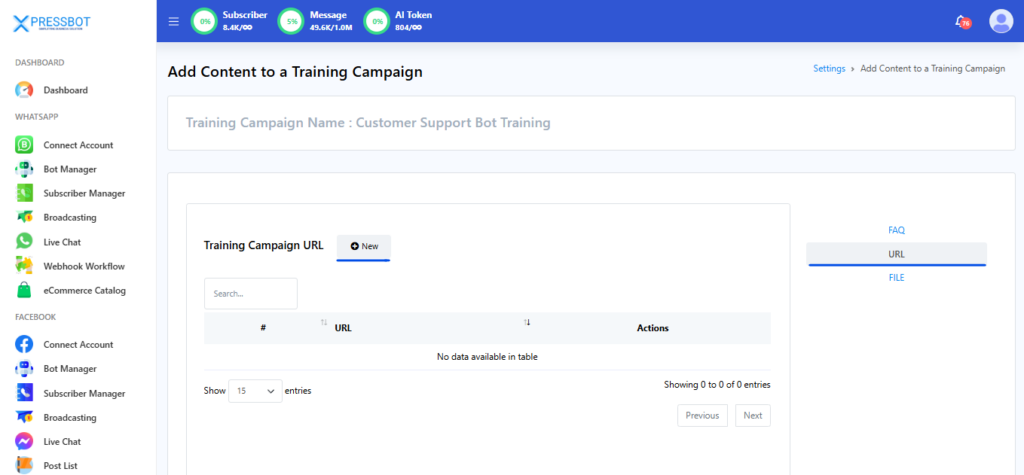
To enhance your XpressBot’s knowledge and capabilities, you can integrate external data by adding URLs. First, switch to the URL option located in the top right corner. Then, click on ‘New’ to insert a URL. This will allow your AI chatbot to fetch real-time data from the provided URL, enabling it to provide up-to-date information and improve its responses based on external sources.
Training the XpressBot AI Chatbot with URL Integration and Content Fetching
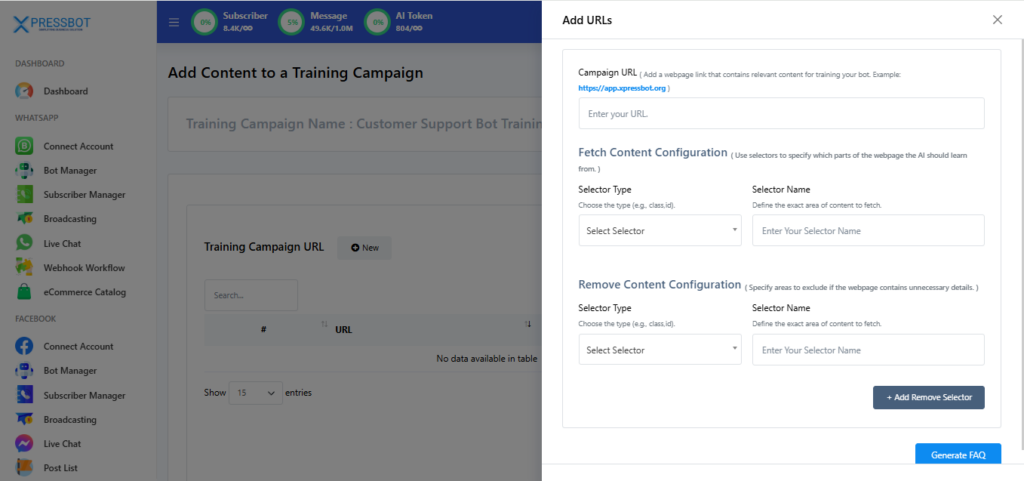
After switching to the URL option and clicking ‘New’, a page will open where you can configure the URL from which your XpressBot will fetch data. In the ‘Fetch Content Configuration’ section, you will need to enter the Campaign URL, which is the webpage from where the bot will retrieve information.
Next, you’ll need to select a ‘Selector’—either ID or Class—depending on the structure of the webpage. The ID is unique to an element on the page, while a Class can apply to multiple elements. The choice of Selector depends on the specific content you want to extract and how the website is structured.
Additionally, you can use the Remove Content Configuration option to exclude certain areas of the page that may not be relevant to the information you want to fetch, such as ads, navigation bars, or footers. By removing these sections, you ensure that the chatbot only retrieves the essential content, providing more accurate and focused responses to users.
Completing the URL Integration and Fetching Data in XpressBot
After adding the URL for your XpressBot training campaign, it’s time to finalize the process and fetch relevant content. For instance, let’s use XpressBot landing page link. I specifically selected the section of the page where XpressBot Integrations are mentioned. After inspecting the page, I found that this part is under the ‘Class’ section. I copied the selector name, which is ‘Container’.
Here’s how to proceed:
- Input the URL and Selector Details: In the Selector field, select ‘Class’ from the dropdown, and then enter the selector name (in this case, ‘Container’) in the Selector Name section.
- No Need for Content Removal: Since I’ve only selected a specific part of the page (the integrations section), there’s no need to remove any content configuration. However, if you were to select a larger section of the page that includes irrelevant elements (like ads or footers), you would need to remove those parts using the Remove Content Configuration option.
- Adding Another URL: To further enhance your XpressBot, you can add another URL for XpressBot Webhook Workflow section. Follow the same steps: inspect the webpage, copy the relevant selector, and input the Class and selector name in the configuration fields. This will allow the chatbot to fetch data about specific features like Webhook Workflows when users ask about them.
- Generate FAQ: Once all URLs and selectors have been added, click ‘Generate FAQ’. This will automatically generate relevant FAQs based on the content fetched from the URL.
- Save the Configuration: After the FAQs are generated, simply click ‘Save’ to finalize the process.
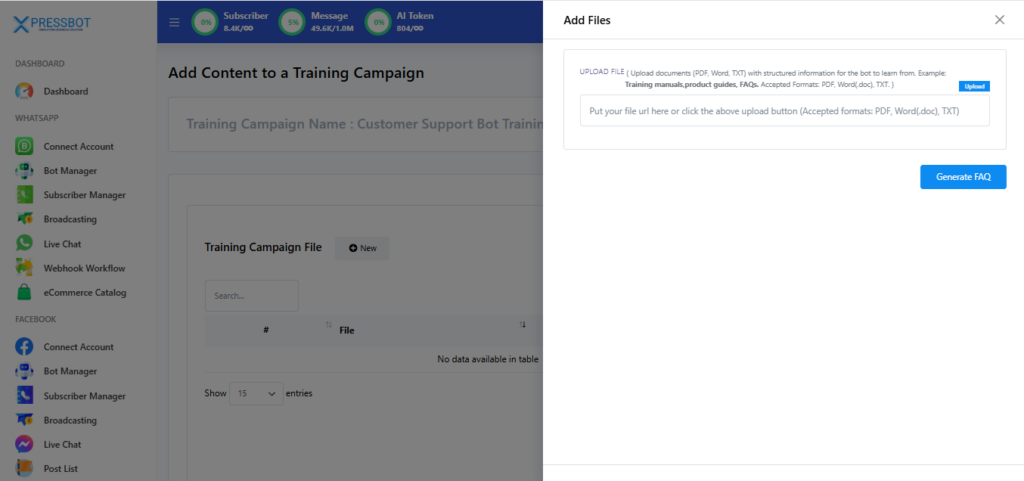
Training the XpressBot AI Chatbot with Files
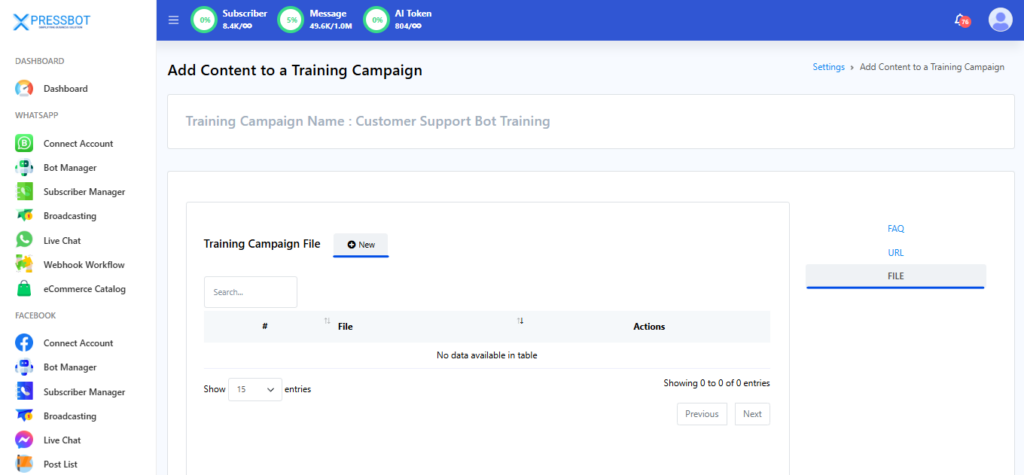
- Switch to File Settings: In the top right corner of your settings page, switch to the ‘File’ option.
- Upload a New File: Click on ‘New’ to begin uploading your file. From here, you can select and upload the relevant document or data file that you want your AI chatbot to use for training.
- Review and Save: Once the file is uploaded, XpressBot will process the content and integrate it into the chatbot’s knowledge base. You can review the content to ensure everything is properly loaded.
Conclusion:
Training your XpressBot AI chatbot with data, URLs, and files is a powerful way to enhance its capabilities, ensuring it provides accurate, real-time responses to user queries. By integrating custom data such as FAQs, relevant URLs, and files, you can tailor the chatbot to handle specific questions about your products, services, or any other business information with high precision.
- Manual FAQ Integration allows you to feed the chatbot with the most common customer queries, ensuring quick and effective responses.
- URL Integration enables XpressBot to fetch real-time data from your website, providing users with up-to-date information about various features and offerings, with the flexibility to target specific sections of a page.
- File Upload provides an additional layer of customization by letting you upload documents or resources that the chatbot can use to answer more detailed or specific questions.
These customization options offer a high degree of control over the chatbot’s performance, ensuring it aligns with your business needs and delivers the best customer support experience. By setting up campaigns, configuring prompts, and providing targeted information from various sources, you can significantly improve the chatbot’s ability to assist users, reducing response times and improving customer satisfaction.
With XpressBot, you not only have a chatbot that interacts with users but also a highly efficient tool for automating customer support and enhancing overall business operations.
