
How to Leverage Dynamic Lists in XpressBot for Interactive WhatsApp Messages
Dynamic lists in XpressBot offer a powerful way to create interactive WhatsApp messages by automatically populating rows based on data stored in custom fields. This feature allows you to dynamically display content—like products, services, or any other personalized data—without having to manually configure each row.
This guide will walk you through how to configure dynamic lists using XpressBot, complete with a product catalog example, and how you can make your WhatsApp interactions even more engaging.
What Are Dynamic Lists in XpressBot?
Dynamic lists in XpressBot are interactive message rows automatically generated from JSON object data stored in custom fields. By specifying the appropriate keys (e.g., product_name, price, etc.), you can create a personalized message that updates based on dynamic data, improving engagement and user experience.
Using XpressBot’s HTTP API call feature, the JSON objects containing dynamic data can be fetched and stored in custom fields for each user, ensuring that the list is tailored to their specific needs or interests.
Interactive List Message Limitations
WhatsApp limits interactive list messages to 10 rows per message. If you have more than 10 items to display, you’ll need to send multiple messages, each containing up to 10 rows. This way, you can manage larger datasets, like product catalogs, across several interactive messages.
Example Use Case: Product Catalog
Imagine you’re sending a product catalog to a user, and your API response might look something like this:
[
  {
    "product_name": "Sony WH-1000XM5 Headphones",
    "price": "$399",
    "description": "Sony’s flagship noise-canceling headphones offering exceptional sound quality and comfort for long listening sessions.",
    "buy_link": "https://www.sony.com/wh-1000xm5"
  },
  {
    "product_name": "Dell XPS 13 Laptop",
    "price": "$1,299",
    "description": "The Dell XPS 13 is a powerful and compact laptop with a 13-inch InfinityEdge display and up to Intel i7 processor.",
    "buy_link": "https://www.dell.com/xps13"
  }
]
With XpressBot, each product will dynamically generate a row in the WhatsApp message, showing the product title, description, and a purchase link as a button.
Step-by-Step Guide to Using Dynamic Lists in XpressBot
Step 1: Fetch Data Using HTTP API
- Set Up the API Request:
- Go to the HTTP API Integration section in XpressBot.Configure the API to fetch your data (e.g., product catalog).
- [
{
“product_name”: “Sony WH-1000XM5 Headphones”,
“price”: “$399”,
“description”: “Sony’s flagship noise-canceling headphones offering exceptional sound quality and comfort for long listening sessions.”,
“buy_link”: “https://www.sony.com/wh-1000xm5”
},
{
“product_name”: “Dell XPS 13 Laptop”,
“price”: “$1,299”,
“description”: “The Dell XPS 13 is a powerful and compact laptop with a 13-inch InfinityEdge display and up to Intel i7 processor.”,
“buy_link”: “https://www.dell.com/xps13”
}
] - Save API Response to Custom Field:
- After fetching the data, store the JSON response in a custom field (e.g., ProductCatalog).
- Make sure the data is saved in JSON format, so XpressBot can retrieve and display it dynamically.
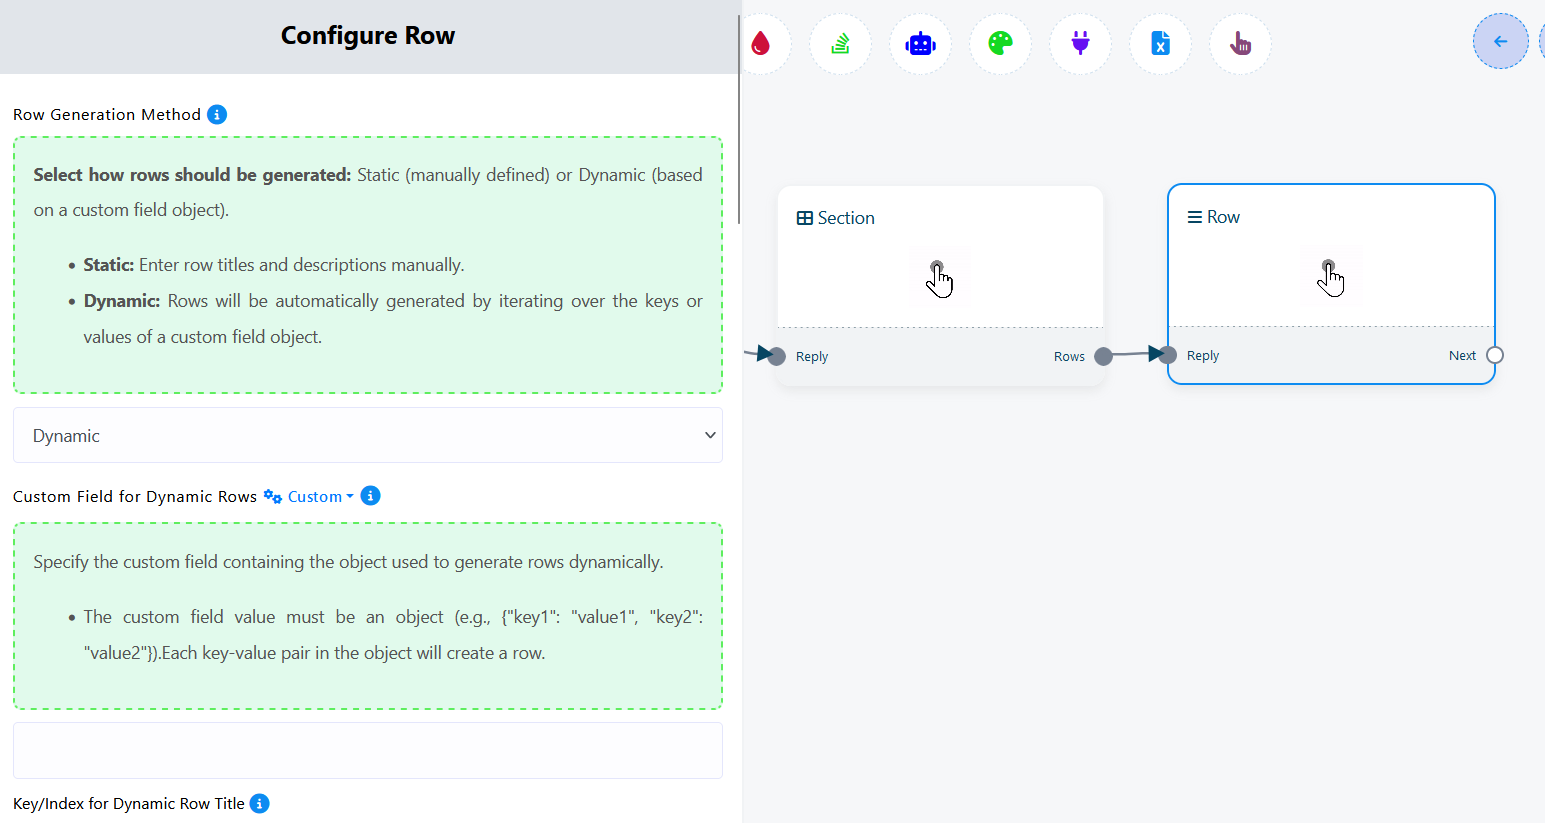
Step 2: Configure Dynamic Rows in the Flow Builder
- Row Generation Method:
- In the Flow Builder, choose Dynamic for row generation.
- Select Custom Field for Dynamic Rows:
- Choose the custom field where the product data is stored (e.g., ProductCatalog).
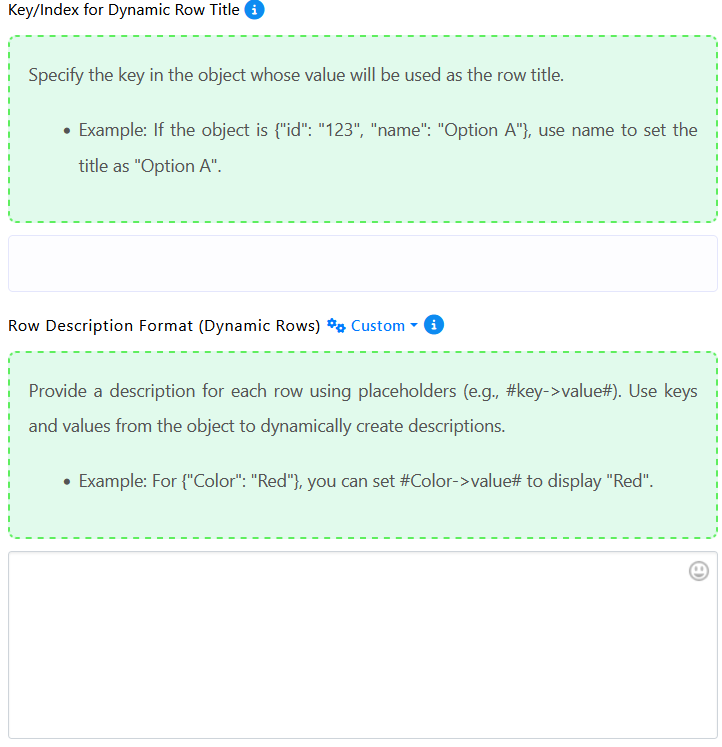
- Specify Row Title Key:
- Use the
product_namekey to generate dynamic titles like “Sony WH-1000XM5 Headphones” or “Dell XPS 13 Laptop”..
- Use the
- Define Row Description Format:
- Use the following format to display the price and description:
#ProductCatalog->price# - #ProductCatalog->description#
- $399 – Sony’s flagship noise-canceling headphones offering exceptional sound quality and comfort for long listening sessions.
- Use the following format to display the price and description:
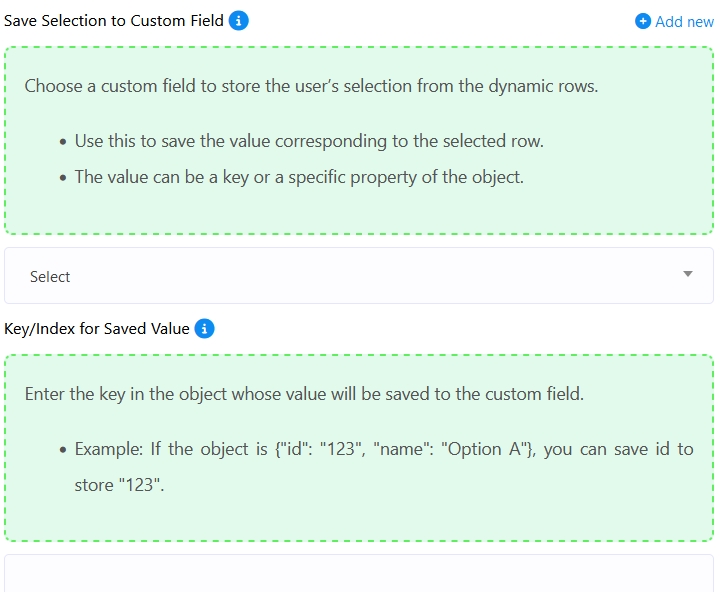
- Save User’s Selection to Custom Field:
- When a user selects a product, store the chosen product’s purchase link in a custom field (e.g., SelectedProduct).
- Set the key (e.g.,
buy_link) that will be saved to this field.
Additional Tips for Optimizing Your Dynamic Lists
- Interactive Buttons and Media: You can enhance your dynamic lists by adding interactive buttons (e.g., “Buy Now”) and images, making the experience richer and more engaging for users.
- Handling Multiple Pages: For larger product catalogs, consider breaking them into pages. You can manage pagination automatically by using a combination of dynamic lists and flow logic, sending multiple messages if there are more than 10 products to display.
- Personalized Lists: Dynamic lists can be personalized based on user data. For example, you could send a customized product catalog based on a user’s previous purchases or interests.
How to Configure and Test Dynamic Lists in XpressBot for Interactive WhatsApp Messages
Dynamic lists in XpressBot allow you to generate WhatsApp messages with content pulled dynamically from your database or API. This feature enables you to create personalized, automated messages like product catalogs, appointment booking systems, and more—all without manually defining each row.
This guide will help you configure dynamic lists, test them, and explore examples with various JSON configurations.
Step 3: Test Your Dynamic List in XpressBot
Once you’ve configured your dynamic list in XpressBot, it’s important to test and ensure everything works as expected.
- Preview the Message: Open the Flow Builder and preview your dynamic list. Verify that the rows are being generated correctly based on the data fetched from the API response.
- Simulate User Interaction: Interact with the previewed message just as a user would. Select a row and confirm that the selected value is being saved into the designated custom field (e.g., product link, appointment date, etc.).
Different Types of JSON Configurations in XpressBot
1. Product Catalog Example
If you have a product catalog stored in your database or through an API, you can dynamically populate the rows in a WhatsApp message with products.
JSON Example:
 [
{
"product_name": "Sony WH-1000XM5 Headphones",
"price": "$399",
"description": "Sony’s flagship noise-canceling headphones offering exceptional sound quality and comfort for long listening sessions.",
"buy_link": "https://www.sony.com/wh-1000xm5"
},
{
"product_name": "Dell XPS 13 Laptop",
"price": "$1,299",
"description": "The Dell XPS 13 is a powerful and compact laptop with a 13-inch InfinityEdge display and up to Intel i7 processor.",
"buy_link": "https://www.dell.com/xps13"
}
]
Dynamic Configuration in XpressBot:
- Row Title (Key):
product_name - Row Description:
#ProductCatalog->price# - #ProductCatalog->description# - Saved Value (Key):
buy_link
Explanation:
- The product name will appear as the row title.
- The row description will show the price and description, fetched from the JSON object.
- When the user selects a product, the purchase link (
buy_link) will be saved into a custom field for future use.
2. Appointment Booking System (One-Dimensional Array)
If you’re sending available appointment dates, here’s how you can handle one-dimensional arrays for appointment scheduling.
JSON Example:
{
  "0": "07-01-2025",
  "1": "08-01-2025",
  "2": "09-01-2025"
}
Dynamic Configuration in XpressBot:
- Row Generation Method: Set to Dynamic.
- Custom Field for Dynamic Rows: Use
#AppointmentDateList#. - Key/Index for Dynamic Row Title: Leave BLANK (because the values don’t have an associative index).
- Row Description Format: Optional (you can keep it static or leave it blank).
- Save Selection to Custom Field: Map the selection to
AppointmentDate#. - Key/Index for Saved Value: Keep BLANK to save the chosen value directly into the custom field.
Explanation:
- This configuration will iterate through the available dates and create a dynamic list.
- When a user selects a date, it is saved directly into the custom field (e.g., AppointmentDate).
3. Appointment Booking with Associative Arrays
In some cases, your data may be structured as an array inside an associative array. This is common when you have multiple fields to display dynamically.
JSON Example:
{
  "success": true,
  "available_dates": {
    "0": "07-01-2025",
    "1": "08-01-2025"
  }
}
Dynamic Configuration in XpressBot:
- Row Generation Method: Set to Dynamic.
- Custom Field for Dynamic Rows: Use
#available_dates#. - Key/Index for Dynamic Row Title: Use
available_dates. - Row Description Format: Optional (you can keep it static or leave it blank).
- Save Selection to Custom Field: Map the selected value to
AppointmentDate#. - Key/Index for Saved Value: Keep BLANK to save the selected date directly.
Explanation:
- This configuration will dynamically iterate through the
available_dateskey and display the available dates as individual rows. - When a user selects a date, it is saved into the AppointmentDate custom field for future reference.
Best Practices for Dynamic Lists in XpressBot
To ensure smooth functionality when working with dynamic lists in XpressBot, follow these best practices:
- Ensure API Responses Are Well-Formatted: Your API response must be a properly formatted JSON array of objects for XpressBot to process it effectively.
- Use Clear Keys and Descriptions: When designing your dynamic list, make sure that the keys are intuitive, and the descriptions are user-friendly.
- Test Before Deploying: Always test your dynamic lists to ensure that rows are generated correctly and that user interactions (like selecting a product or appointment) are saved properly.
Real-Life Example: How to Display WooCommerce Products Inside WhatsApp
Here’s a real-life example using XpressBot to display products from a WooCommerce store directly within WhatsApp messages.
- Fetch Data via WooCommerce API:
- Use the WooCommerce API to fetch product data (e.g.,
product_name,price,description, andbuy_link). - Save this data in a custom field (e.g., ProductCatalog).
- Use the WooCommerce API to fetch product data (e.g.,
- Configure Dynamic List:
- In the XpressBot Flow Builder, use the configuration settings to dynamically generate product rows using the custom field data.
- Use the
product_namefor row titles,priceanddescriptionfor the row description, and thebuy_linkfor the saved value.
- Test the Configuration:
- After configuring the dynamic list, preview the message to ensure products are displayed correctly.
- Test user interaction to confirm that selecting a product saves the purchase link.
Conclusion
Dynamic lists in XpressBot provide an efficient and engaging way to create interactive WhatsApp messages. Whether you’re displaying a product catalog, available appointment dates, or any other dynamic data, you can automate the process of populating rows using custom fields and API calls.
By following the guidelines and examples provided, you’ll be able to set up personalized and interactive messages that provide value to your users and enhance their experience.